Adding and returning parts and purchases on a work order in the mobile app
- Tap the Work Orders icon at the bottom of the screen.
- Select the work order you need to add parts to by tapping on the work order in the list. You can use the search (
 ) and filtering (
 ) options to quickly find the work order if needed.
Adding work order parts
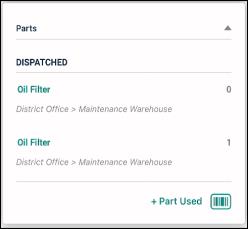
This card is for logging any parts used to complete the work order.
- Scroll down to the Parts & Inventory card.
- Tap + Part Used to search and select a Part from your organization's inventory or tap the scanner icon (
 ) to scan a QR code or barcode of the Part.
 - Adjust the quantity used on the work order in the Quantity Used field.
- Select the proper Usage Type.
- Select the part Location.
- Enter a Description, if necessary.
- The Date Used field will default to today's date and time, but you can change it, if necessary.
- Select a Cost Center.
- The Total Cost will represent the Unit Price multiplied by the quantity.
- Tap the Add to Work Order button at the bottom of the screen.
- The part will be added to the work order and sorted by the selected Usage Type.
- Tap the part name to be taken back to the part form. Adjust any details or Delete the part if needed.
- When you are finished adding parts, tap the Save Work Order button.
Returning work order parts
You can set up your account to ensure that a separate transaction is made when returning parts that were not needed for a work order. This feature will prevent part transactions on a work order from being edited or deleted. *Note: A Global Administrator must enable this feature in the system settings.
- Scroll down to the Parts & Inventory card.
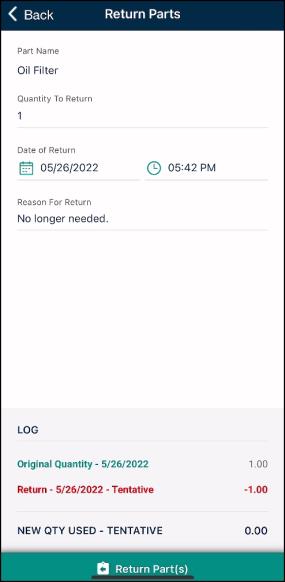
- Tap on the part name that needs to be returned.
- Enter the amount that needs to be returned in the Quantity to Return field.
- The Date of Return field will default to the current date and time, but can be changed if necessary.
- Enter a Description to record the reason for the return.
- In the Log section, verify the New Qty Used is accurate, then tap Return Part(s).
- To complete the return, tap the Save Work Order button.
Adding purchases
This card is for logging any purchases that are made to complete the work order.
- Scroll down to the Purchases card.
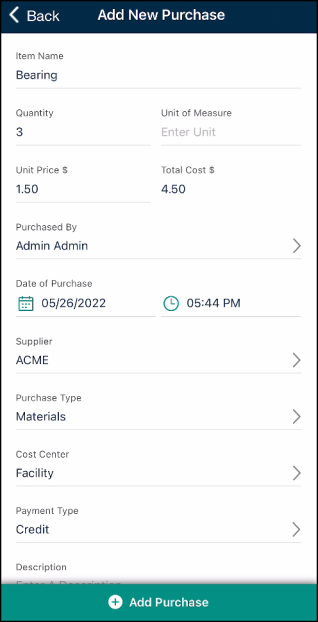
- Tap + Purchase.
- Enter the Item Name.
- Enter the Quantity and Unit of Measure of the purchased part.
- Enter the Unit Price $ for the purchased part.
- The Total Cost field will automatically calculate based on the values in the Quantity and Unit Price fields.
- The Purchased by field will default to the user who is logged in. To change the user, tap the arrow and select a new user from the list.
- Adjust the Date of Purchase, if necessary.
- Tap the arrow in the Suppliers field and select the appropriate supplier from the list.
- Tap the arrow in the Purchase Type field and select the appropriate purchase type from the list. *Note: This list is pre-defined and cannot be configured.
- Select a Cost Center.
- Tap the arrow in the Payment Type field and select the appropriate payment type from the list. *Note: This list is pre-defined and cannot be configured.
- If you selected Invoice or Purchase Order in the Payment Type field, enter the reference number that aligns with your selection. *Note: This field is intended for documenting external reference numbers only and will not link to any other areas in Asset Essentials.
- Enter a Description, if necessary.
- Tap the Add Purchase button.
- When you are finished adding purchases, tap the Save Work Order button.
Returning purchases
You can set up your account to ensure that a separate transaction is made when returning purchases that were not needed for a work order. This feature will prevent part transactions on a work order from being edited or deleted. *Note: A Global Administrator must enable this feature in the system settings.
- Scroll down to the Purchases card.
- Tap on the name of the purchase that needs to be returned.
- Enter the amount that needs to be returned in the Quantity to Return field.
- The Date of Return field will default to the current date and time, but can be changed if necessary.
- Enter a Description to record the reason for the return.
- In the Log section, verify the New Qty Used is accurate, then tap Return Part(s).
- To complete the return, tap the Save Work Order button.
